I really wanted to get this pattern released before Christmas (which includes getting it out before a cruise I’m taking on the 22nd)! I ran out of time due to some well-timed migraines (just kidding, they’re never well timed and should just never happen), so I decided to publish a ‘recipe’ of sorts. This is a quick and dirty version of the pattern that hasn’t been tech edited or tested, so knit at your own risk! It’s also free, so there’s that. 😉
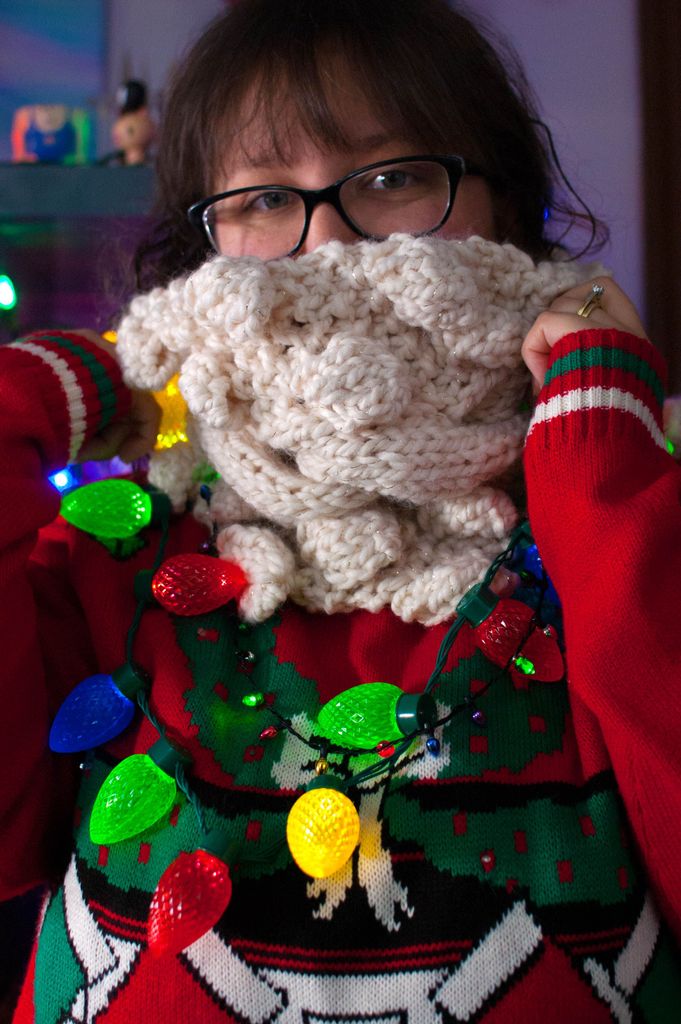
The Wishing For Snow Cowl is the perfect winter knit, with a huge squishy cable running through the middle, surrounded by big baubles! Knitting baubles with super bulky yarn is a fun, cozy treat.
Size
10.25″/26cm wide x 21.75″/55cm around
Materials
- Yarn: Lion Brand Yarn Company ‘Wool-Ease Thick & Quick’ (79% Acrylic, 20% Wool, 1% Metallic Polyester, 84 m per 140g skein); 1 skein; sample uses color “Starlight” or find a super bulky yarn that knits up close to gauge.
- Needles: US 17 / 13mm
- Cable Needle
- Darning needle
Gauge
9 sts x 7.5 rows = 4″/10cm in stockinette
If you want to just start the cowl, make sure your full width is 10.25″/26cm and that your row gauge is coming out about the same as above. If your row gauge is off, use your judgement to add or subtract rows from the completed cowl.
Pattern Overview
Here’s what’s going on:
- The cowl is knitted flat, with both end are sewn together to create a cowl.
- The first and last seven stitches of each row are in seed stitch (k1, p1 on the right and wrong sides).
- The middle 12 stitches are knit (purled on the WS) and crossed over every 12th row (6/6 RC).
- Starting on the 5th row (RS), and every fourth row after that, we’re making a bobble on the 2nd outermost stitches or the second innermost stitches of the seed stitch section (so the 6th and 20th stitches in the row). This will alternate. For example, on the 5th row, we’ll make bobbles on the outside of the seed stitch section, on the 9th row we’ll make them on the inside, on the 13th row, we’ll make them on the outside again, and so on.
- I decided on 73 rows because that’s what fit my neck and made the spacing between first cable crossover and the last one line up. You can go shorter or longer depending on how much yarn you have!
The Quick and Dirty Pattern
CO 26 sts.
Row 1 and most RS rows: (K1, p1) x 3, k14, (p1, k1) x 3.
Row 2 and most WS rows: (K1, p1) x 3, k1, p12, k1, (p1, k1) x 3.
Unless specified below, knit your rows as above.
Row 5, 13, 29, 37, 53, 61: K1, mb, (k1, p1) x 2, k14, (p1, k1) x 2, mb, k1.
Row 17, 25, 41, 49, 65, 73: (K1, p1) x 2, k1, mb, k14, mb, (k1, p1) x 2, k1.
Row 9, 33, 57: (K1, p1) x 2, k1, mb, k1, 6/6 RC, k1, mb, (k1, p1) x 2, k1.
Row 21, 45, 69: K1, mb, (k1, p1) x 2, k1, 6/6 RC, k1, (p1, k1) x 2, mb, k1.
Knit in this pattern for 73 rows, BO, leaving a long tail. Use the tail to stitch together both ends of the cowl.
Abbreviations
6/6 RC – Right cross cable.
BO – Bind off
CO – Cast On
K – Knit
MB – Make bobble
P – Purl
RS – Right side
WS – Wrong side
How To
MB – This site has a great tutorial on creating bobbles! https://www.craftsy.com/blog/2014/02/how-to-knit-a-bobble-stitch/ (Follow the “How to Knit a Large Bobble” instructions)
6/6 RC – Put next 6 sts on cable needle, hold cable needle in back. Knit next 6 sts, knit the 6 sts off of the cable needle. Check out my 2/2 Cable Tutorial you can do the same thing I do in the video, except with 6 and 6 stitches rather than 2 and 2.
I hope you have fun knitting this! If you have any questions, comment below!